Peace of Mind for Your Home: Understanding and Maintaining Your Septic System

Key Takeaways

  • Learn how septic systems function and the importance of ongoing maintenance.
  • Dispel myths and uncover practical tips for septic care to prevent costly issues.
  • Understand the environmental impact of septic systems and how to manage them responsibly.

Most houses in areas bereft of centralized sewer systems rely on septic systems for wastewater treatment and disposal. These complex systems integrate natural processes and technology to manage household waste effectively. They’re often misunderstood as autonomous units that require minimal to no intervention. However, this is a common misconception that can lead to significant issues down the line. A septic system consists of a septic tank and a soil absorption field, also known as a drain field, which work together to filter and purify household wastewater. Homeowners need to understand that they’re responsible for the upkeep of this system, as regular maintenance is essential for its optimal functionality.

Regular Maintenance: A Necessary Routine

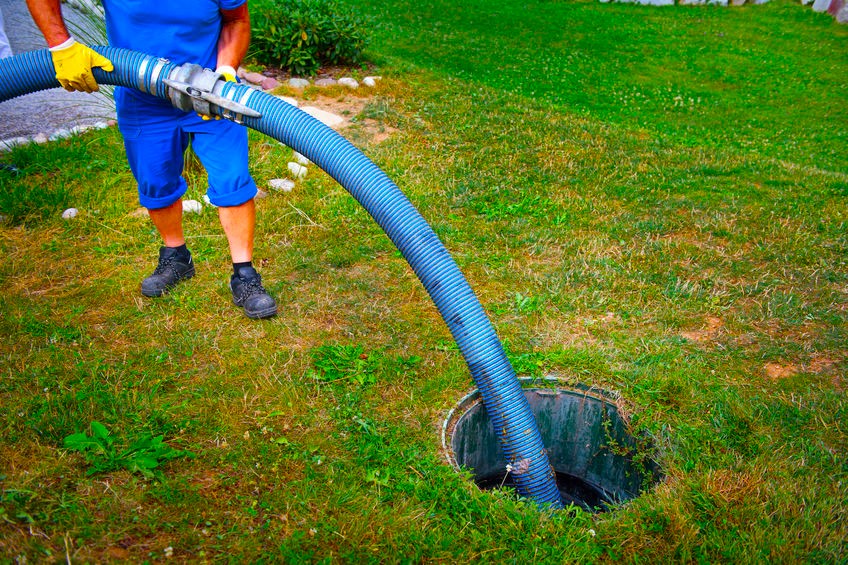
A septic system is not unlike a vehicle—it needs regular check-ups to run smoothly. A professional septic tank draining Orlando, FL that can recommend the appropriate service schedule should evaluate these systems every three years. The pumping frequency depends on the tank’s size, the number of people in the household, and the overall water use. Sticking to a maintenance routine not only prolongs the life of your system but also prevents health hazards and environmental damage due to system failure. A well-maintained septic system ensures proper wastewater treatment and prevents contamination of nearby water sources. Neglecting regular maintenance can result in costly repairs or even the need for a complete system replacement. By scheduling regular draining and inspection services with reputable professionals, homeowners can avoid these potential issues and enjoy peace of mind regarding their septic system’s functionality.

The Do’s and Don’ts of Septic System Upkeep

To properly care for your septic system, managing household waste is crucial. This means being conscious of what goes down your drains and toilets. Water must be conserved to reduce the volume of wastewater that must be treated and absorbed. Don’t dispose of non-biodegradable items in toilets, like diapers or plastics. One of the most harmful practices includes disposing of cooking grease and oils down sinks, which can clog the septic system’s pipes and cause backups.

Maintaining a Healthy Septic System in Different Climates

Climates across the country vary, each bringing challenges for septic systems. For example, in wetter climates, septic fields can become oversaturated, whereas in colder regions, systems might struggle with freezing temperatures. Each scenario might require different strategies to mitigate potential problems, such as increased inspections during wet seasons or added insulation for components in colder areas. Adapting maintenance procedures to local climate conditions is essential to protect the system’s integrity.

Septic System Pumping: When and Why It’s Necessary

Pumping is an integral component of septic system maintenance. Over time, solid waste accumulates and forms a layer of sludge at the bottom of the septic tank, and if not removed, it can lead to backups and other serious issues. Professionals inspect the tank for cracks, leaks, and other potential problems during a routine pump-out. The Environmental Protection Agency provides a comprehensive guide on The Benefits of Regular Septic Pumping, which homeowners will find indispensable.

The Environmental Aspect of Septic System Management

A well-maintained septic system is a sign of a responsible homeowner and an ally in the fight to protect our water resources. Efficient systems prevent the leaching of contaminants into soil and waterways, thereby upholding public health and environmental standards. The Centers for Disease Control and Prevention provides guidelines on protecting water quality with intelligent septic system practices, emphasizing the importance of proper septic management in safeguarding water quality.

Final Reflections on the Importance of Septic System Awareness

To sum up, septic system management is an often overlooked but critically important aspect of home maintenance. Simple practices and routine checks can extend the life of your system, prevent costly breakdowns, and protect the environment. By embracing our role as stewards of this essential infrastructure and heeding expert guidance, we ensure the well-being of our communities and the natural world surrounding us.

Featured Image Source:

The Hidden Dangers of Neglecting Air Duct Maintenance

Maintaining clean and well-maintained air ducts is essential for ensuring a healthy and comfortable indoor environment in your home. However, many homeowners overlook the importance of regular air duct maintenance, unaware of the hidden dangers that can arise from neglect. In this blog post, we’ll delve into the various risks associated with neglecting air duct maintenance and why it’s crucial to invest in professional home duct cleaning services in Columbia, TN, to keep your air ducts clean and free of hazards.

Mold Growth

One of the most significant dangers of neglecting air duct maintenance is the growth of mold and mildew within your ductwork. Mold thrives in dark, damp environments, making your air ducts an ideal breeding ground. When mold spores are circulated throughout your home via your HVAC system, they can trigger allergic reactions, respiratory issues, and other health problems in sensitive individuals. By investing in regular duct cleaning services in Columbia, TN, you can prevent mold growth and maintain a healthy indoor environment for you and your family.

Fire Hazards

Dirty and clogged air ducts can also pose a significant fire hazard in your home. When dust, debris, and other flammable materials accumulate in your ductwork, they can become a potential ignition source. If a spark from your HVAC system or another source ignites the buildup in your air ducts, it can quickly lead to a fire that spreads throughout your home. Regular air duct maintenance, including cleaning and inspection, can help mitigate this risk and ensure the safety of your home and family.

Pest Infestations

Neglected air ducts can attract pests such as rodents, insects, and other vermin, creating a host of problems for homeowners. These pests can not only damage your ductwork but also contaminate your indoor air with droppings, dander, and other allergens. Additionally, pests like rodents can chew through your ductwork, leading to leaks and airflow issues. By investing in professional duct cleaning services in Columbia, TN, you can remove these pests and prevent infestations from occurring, protecting your home and family from potential health hazards.

Indoor Pollution

Dirty air ducts can contribute to indoor pollution by circulating contaminants such as dust, pollen, pet dander, and VOCs (volatile organic compounds) throughout your home. These pollutants can trigger allergic reactions, exacerbate respiratory issues, and contribute to overall discomfort for you and your family. By neglecting air duct maintenance, you’re allowing these pollutants to accumulate and recirculate in your indoor air, compromising the health and well-being of your household. Regular duct cleaning services in Columbia, TN, can help remove these pollutants and improve indoor air quality, creating a healthier and more comfortable living environment.

In conclusion, neglecting air duct maintenance can lead to a variety of hidden dangers and health hazards for homeowners. From mold growth and fire hazards to pest infestations and indoor pollution, the risks associated with dirty and neglected air ducts are significant. By investing in professional home duct cleaning services in Columbia, TN, you can mitigate these risks, ensure the safety and comfort of your home, and enjoy peace of mind knowing that your air ducts are clean and free of hazards.

Learn How To Clean White Converse Shoes

White Converse shoes are a timeless classic, but maintaining their pristine appearance can be a challenge, especially when faced with inevitable dirt and stains. Fear not, as with the right techniques, you can keep your white Converse looking fresh and vibrant. In this article, we will provide you with a step-by-step guide on how to clean white Converse shoes effectively.

Keeping it Crisp: A Guide on How to Clean White Converse Shoes

Remove Laces and Insoles

Before diving into the cleaning process, remove the shoelaces and insoles from your Converse shoes. This will allow you to clean these components separately and ensure a more thorough cleaning for the entire shoe.

Brush Off Surface Dirt

Use a soft-bristle brush or an old toothbrush to gently brush off any loose dirt or debris from the surface of the shoes. This preliminary step helps prevent rubbing dirt into the fabric during the cleaning process.

Create a Cleaning Solution

Mix a small amount of mild detergent or liquid soap with warm water to create a soapy solution. Avoid using harsh chemicals, as they may damage the fabric or rubber of your Converse shoes.

Spot Clean Stains

Dip a soft cloth or the bristles of a toothbrush into the soapy solution, and gently scrub any visible stains or areas with discoloration. Focus on stained regions, such as scuff marks or mud spots, and work the cleaning solution into the fabric.

Clean Laces and Insoles

Soak the laces in the soapy solution or consider replacing them if they are heavily stained. Clean the insoles separately by gently scrubbing them with a brush or cloth. Allow both the laces and insoles to air dry completely before reattaching them to the shoes.

Machine Wash (optional)

If your Converse shoes are machine-washable, you can place them in a pillowcase or mesh laundry bag to protect them during the wash. Use a gentle cycle with cold water and avoid using bleach. Air dry the shoes afterward to maintain their integrity.

Whiten the Rubber Soles

For the rubber soles, create a paste using baking soda and water. Apply the paste to the rubber portions of the shoes, scrubbing gently with a brush. Allow it to sit for a few minutes before rinsing off the paste.

Air Dry Properly

After cleaning, allow your Converse shoes to air dry naturally. Avoid exposing them to direct sunlight or using artificial heat sources like hair dryers, as this can cause the fabric and rubber to deteriorate.

FAQs

Can I clean my white Converse shoes in a washing machine?

Yes, you can clean your white Converse shoes in a washing machine. Place them in a pillowcase or mesh laundry bag to protect them during the wash. Use a gentle cycle with cold water and avoid using bleach. Air dry the shoes afterward to maintain their integrity.

What’s the best way to remove stains from white Converse shoes?

For stain removal, create a soapy solution using mild detergent or liquid soap with warm water. Dip a soft cloth or toothbrush into the solution and gently scrub the stained areas. For rubber soles, a paste made from baking soda and water can be used to whiten and remove stains.

Is it necessary to remove the laces and insoles when cleaning white Converse shoes?

Yes, it’s recommended to remove the laces and insoles before cleaning white Converse shoes. This ensures a more thorough cleaning for the entire shoe. Clean the laces separately by soaking them in the soapy solution, and gently scrub the insoles to maintain the overall freshness of your sneakers.

Final Thought

With a bit of care and attention, you can keep your white Converse shoes looking as crisp and clean as the day you bought them. Regular cleaning, spot treatments for stains, and proper drying techniques will ensure that your iconic white sneakers remain a stylish and timeless accessory for any outfit. Keep these steps in mind, and your Converse shoes will continue to make a bold and fresh statement with every step.

Unleash the Power of Klean Strip Paint Sprayer Cleaner

Revolutionize your painting experience with the incredible Klean Strip Paint Sprayer Cleaner. If you’re tired of struggling with clogged paint sprayers, wasted time, and subpar cleaning methods, then look no further. In this article, we’ll delve into the amazing features of Klean Strip Paint Sprayer Cleaner and explore why it has become a game-changer for both professional painters and DIY enthusiasts alike.

The Perfect Cleaning Solution for Paint Sprayers

Maintaining a paint sprayer is crucial for achieving flawless painting results, and Klean Strip Paint Sprayer Cleaner offers the perfect solution. With its powerful formulation, this cleaner is specially designed to remove stubborn paint residues, clogs, and contaminants from your paint sprayer. It ensures a clean and efficient paint flow, preventing blockages and reducing downtime during your projects.

Quick and Efficient Cleaning Process

Gone are the days of spending hours scrubbing and scraping to clean your paint sprayer. Klean Strip Paint Sprayer Cleaner simplifies the cleaning process, saving you valuable time and effort. Its advanced formula effortlessly dissolves dried paint and clears residue build-up in no time. Simply follow the instructions, and you’ll have your paint sprayer ready for the next project in a matter of minutes.

Versatile Application

Whether you’re using an airless, HVLP, or any other type of paint sprayer, Klean Strip Paint Sprayer Cleaner is compatible with all models. Its versatility allows it to effectively clean various types of paint, including oil-based, latex, and enamels. No matter the type of paint you’re using, this cleaner ensures a pristine and well-maintained paint sprayer every time.

Environmentally Friendly

Klean Strip Paint Sprayer Cleaner not only delivers exceptional cleaning performance but also prioritizes environmental sustainability. It is formulated to be low in VOCs (volatile organic compounds) and contains no harmful chemicals like methylene chloride. This eco-friendly cleaner is safe to use, ensuring a healthier work environment for you and your colleagues.

Extends the Lifespan of Your Paint Sprayer

Regularly cleaning your paint sprayer with Klean Strip Paint Sprayer Cleaner helps extend its lifespan and maintain its optimal performance. By preventing the build-up of paint residues and contaminants, you’ll avoid costly repairs or the need for premature replacement. With this cleaner, you’ll get the most out of your paint sprayer investment, ensuring consistent, high-quality results for years to come.

Convenient Packaging Options

Klean Strip understands the diverse needs of painters, which is why they offer their Paint Sprayer Cleaner in various packaging options. From small bottles for occasional use to larger containers for professional projects, you can choose the size that suits your requirements. This flexibility ensures you always have the right amount of cleaner on hand, without wastage.

FAQs

How does Klean Strip Paint Sprayer Cleaner work?

Klean Strip Paint Sprayer Cleaner is formulated with powerful cleaning agents that effectively dissolve dried paint and remove residue build-up in paint sprayers. It works by breaking down and loosening the paint particles, allowing for easy removal. Simply follow the instructions on the packaging to properly use the cleaner and restore your paint sprayer to its optimal condition.

Is Klean Strip Paint Sprayer Cleaner safe to use?

Yes, Klean Strip Paint Sprayer Cleaner is designed to be safe for use. It is formulated to be low in VOCs (volatile organic compounds) and does not contain harmful chemicals like methylene chloride. This makes it a suitable choice for both professional painters and DIY enthusiasts. However, it’s always important to follow the safety guidelines provided on the product label, such as wearing protective gloves and ensuring proper ventilation during use.

Can Klean Strip Paint Sprayer Cleaner be used with different types of paint sprayers and paints?

Absolutely! Klean Strip Paint Sprayer Cleaner is compatible with various types of paint sprayers, including airless, HVLP, and others. It is also effective in cleaning different types of paint, such as oil-based, latex, enamels, and more. Whether you’re using a professional-grade sprayer or a smaller DIY model, you can rely on Klean Strip Paint Sprayer Cleaner to remove paint residues and maintain the performance of your equipment.

Conclusion

Klean Strip Paint Sprayer Cleaner has revolutionized the way painters clean and maintain their paint sprayers. With its powerful formula, quick cleaning process, and versatility, this cleaner offers an unbeatable solution for achieving spotless results. Say goodbye to clogged sprayers and inefficient cleaning methods. Embrace the power of Klean Strip Paint Sprayer Cleaner and take your painting projects to new heights of perfection.

The Ultimate Guide to Finding the Best Paint Sprayer for Walls

Painting walls can be a time-consuming and tiresome task, but with the right tool in hand, the process can become a breeze. Enter the paint sprayer for walls, a game-changing device that offers efficiency, speed, and a professional finish. In this article, we’ll explore the top contenders for the title of the best paint sprayer for walls, helping you make an informed decision for your next painting project.

Factors to Consider When Choosing a Paint Sprayer

Power and Performance: 

Look for a sprayer with sufficient horsepower and pressure to handle different types of paints and coatings.

Nozzle Options: 

The sprayer should come with various nozzle sizes for different applications, such as broad coverage or precise detailing.

Adjustable Settings: 

Opt for a paint sprayer that allows you to adjust the spray pattern, flow rate, and air pressure to match your project’s requirements.

Portability and Ergonomics: 

Consider the weight, handle design, and overall maneuverability of the sprayer, especially for extended painting sessions.

Maintenance: 

Look for sprayers with easy-to-clean components and straightforward maintenance requirements.

Graco Magnum X5 Stand Airless Paint Sprayer

The Graco Magnum X5 is a popular choice for homeowners and DIY enthusiasts. It boasts a lightweight design, easy setup, and adjustable pressure control. With its stainless steel piston pump, it can handle various materials, including unthinned paints. The X5’s flexible suction tube allows for uninterrupted painting, even when the sprayer is tilted. It’s a reliable and versatile option for small to medium-sized wall painting projects.

Wagner Spraytech Control Pro 170 High-Efficiency Airless Paint Sprayer

The Wagner Spraytech Control Pro 170 offers high-efficiency airless technology, ensuring a professional finish with minimal overspray. Its 515 HEA (High Efficiency Airless) reversible tip allows for precise control and excellent coverage. The sprayer’s integrated digital display and pressure control system make it easy to adjust settings for different painting tasks. With its powerful motor and lightweight design, the Control Pro 170 is suitable for both interior and exterior wall painting projects.

Fuji 2203G Semi-PRO 2 – HVLP Spray System

If you prefer HVLP (High Volume Low Pressure) systems, the Fuji 2203G Semi-PRO 2 is an excellent choice. It features a professional-grade HVLP turbine system that delivers a fine finish and minimal overspray. The non-bleed spray gun provides adjustable fan control and allows for easy cleaning. The Fuji 2203G is a reliable option for professionals and enthusiasts who value precision and craftsmanship in their wall painting projects.

HomeRight Power Flo Pro 2800 C800879 Airless Paint Sprayer

The HomeRight Power Flo Pro 2800 is a budget-friendly option that doesn’t compromise on performance. Equipped with a ½ HP motor and an adjustable pressure control knob, it offers versatility for various painting tasks. This sprayer comes with a reversible tip for easy unclogging and maintenance. While it may not have all the bells and whistles of high-end models, the Power Flo Pro 2800 provides a cost-effective solution for homeowners looking to tackle their wall painting projects.

FAQs

What is the best paint sprayer for walls?

The best paint sprayer for walls ultimately depends on your specific needs and preferences. However, some highly recommended options are the Graco Magnum X5 Stand Airless Paint Sprayer, Wagner Spraytech Control Pro 170 High-Efficiency Airless Paint Sprayer, and Fuji 2203G Semi-PRO 2 – HVLP Spray System. These sprayers offer a combination of power, performance, adjustable settings, and ease of use, making them popular choices among homeowners and professionals alike.

Are airless paint sprayers or HVLP systems better for wall painting?

Both airless paint sprayers and HVLP systems have their advantages for wall painting. Airless paint sprayers, like the Graco Magnum X5 and Wagner Control Pro 170, are known for their high-speed performance, ability to handle thicker paints, and wide coverage. They are ideal for larger projects and exterior walls. On the other hand, HVLP systems, such as the Fuji 2203G Semi-PRO 2, offer precise control, fine finishes, and reduced overspray. They are popular for interior walls and projects that require meticulous detailing. The choice between the two ultimately depends on your specific project requirements and personal preferences.

Can I use any paint sprayer for wall painting, or are there specific features to look for?

While many paint sprayers can be used for wall painting, it’s important to consider certain features to ensure the best results. Look for a sprayer with adjustable settings, such as spray pattern, flow rate, and air pressure, to match the size and type of your walls. Ensure that the sprayer comes with suitable nozzle options for broad coverage or precise detailing. Additionally, consider the power and performance of the sprayer to handle different paints and coatings effectively. Finally, portability, ease of cleaning, and overall ergonomics are also factors to consider, especially for extended painting sessions. By selecting a paint sprayer with these features in mind, you can achieve professional-looking results with ease and efficiency.

Conclusion

Finding the best paint sprayer for walls can significantly enhance your painting experience and deliver professional results. Consider factors such as power, nozzle options, adjustability, portability, and maintenance when making your decision. The Graco Magnum X5, Wagner Spraytech Control Pro 170, Fuji 2203G Semi-PRO 2, and HomeRight Power Flo Pro 2800 are all top contenders worth considering. Choose the one that best fits your needs and get ready to transform your walls with ease and efficiency. Happy painting!

Effortless Paint Sprayer Cleanup: Unlocking the Power of Mineral Spirits

When it comes to paint sprayer cleanup, finding the right cleaning solution can make all the difference. Among the various options available, mineral spirits stand out as a go-to choice for effectively and efficiently cleaning paint sprayers. In this article, we will delve into the wonders of mineral spirits and explore how they can simplify your paint sprayer cleaning process, ensuring flawless results time and time again.

Understanding Mineral Spirits

Mineral spirits, also known as white spirits or mineral turpentine, are petroleum-based solvents derived from crude oil. They are renowned for their excellent degreasing and cleaning properties, making them a reliable choice for removing paint residue and grime from paint sprayers.

The Power of Mineral Spirits for Paint Sprayer Cleanup

Dissolving Paint Buildup:

One of the primary challenges in paint sprayer maintenance is dealing with paint buildup that can clog the nozzle and hinder the sprayer’s performance. Mineral spirits work wonders in dissolving and loosening paint particles, allowing for easy removal and thorough cleaning of the sprayer components.

Removing Stubborn Stains:

Paint sprayers often encounter stubborn stains and dried paint spots that are challenging to remove. Mineral spirits excel at breaking down these tough stains, helping you restore the sprayer to its optimal condition. By applying mineral spirits with a clean cloth or brush, you can effortlessly remove even the most stubborn paint residues.

Step-by-Step Guide to Cleaning a Paint Sprayer with Mineral Spirits

Now that we understand the power of mineral spirits, let’s walk through a simple step-by-step guide to cleaning your paint sprayer effectively:

Safety First:

Ensure you are working in a well-ventilated area or outdoors. Wear protective gloves and safety goggles to shield yourself from any potential hazards.

Disassemble the Sprayer:

Carefully disassemble the paint sprayer according to the manufacturer’s instructions. Remove the nozzle, gun, filters, and any detachable parts that come into contact with paint.

Soak in Mineral Spirits:

Fill a container with enough mineral spirits to submerge the disassembled parts completely. Place the parts in the container and let them soak for about 30 minutes. This will allow the mineral spirits to penetrate and dissolve the paint residues.

Scrub and Rinse:

Using a brush or cloth, gently scrub the soaked parts to remove any loosened paint. Rinse the components thoroughly with fresh mineral spirits to ensure all traces of paint are removed.

Dry and Reassemble:

After rinsing, allow the components to air dry completely. Once dry, reassemble the paint sprayer carefully, ensuring all parts are properly secured.

Precautions and Tips

Always follow safety guidelines provided by the manufacturer and wear appropriate protective gear.

Dispose of used mineral spirits responsibly in accordance with local regulations.

Before using mineral spirits, make sure they are compatible with the materials used in your paint sprayer. Consult the manufacturer’s instructions if in doubt.

Regularly clean your paint sprayer to prevent paint buildup and maintain optimal performance.

FAQs

Can I use mineral spirits to clean any type of paint sprayer?

Mineral spirits are generally safe to use for cleaning most types of paint sprayers. However, it is important to check the manufacturer’s instructions and guidelines for your specific paint sprayer model. Some sprayers may have components that are not compatible with mineral spirits, so it’s best to consult the manufacturer’s recommendations before proceeding.

Are there any safety precautions I should take when using mineral spirits for paint sprayer cleanup?

Yes, safety precautions are essential when working with mineral spirits. Make sure to work in a well-ventilated area or outdoors to avoid inhaling fumes. Wear protective gloves and safety goggles to protect your skin and eyes. Avoid any open flames or sparks in the vicinity, as mineral spirits are flammable. Additionally, always dispose of used mineral spirits responsibly according to local regulations.

How often should I clean my paint sprayer with mineral spirits?

The frequency of cleaning your paint sprayer with mineral spirits depends on the intensity and frequency of your painting projects. As a general guideline, it is recommended to clean your sprayer thoroughly after each use. Regular cleaning helps prevent paint buildup, clogs, and ensures optimal performance. Additionally, if you notice a decrease in spray quality or experience any issues with the sprayer, it’s a good idea to clean it with mineral spirits to remove any potential blockages or residues.

Conclusion

Cleaning a paint sprayer can be a breeze when armed with the right tool, and mineral spirits prove to be an invaluable ally in achieving that spotless finish. With their paint-dissolving and stain-removing properties, mineral spirits simplify the cleaning process and ensure your paint sprayer is always ready for the next project. Remember to follow safety guidelines and enjoy hassle-free paint sprayer cleanup with the magic of mineral spirits!

4 Compelling Reasons Why Hiring a Professional for Your Kitchen Interior Design is a Smart Choice

Whether you want to remodel or upgrade your kitchen, you need an efficient floor plan and design that will work for your family. A professional designer can help you do just that. They’re trained to think about your needs and use their knowledge of space, workflow, lighting, ergonomics, and materials to create a functional layout you’ll love.

They Know the Latest Trends

One of the crucial areas in a home is the kitchen. It’s where you spend most of your time, and it’s also where you entertain guests. A professional designer will know the latest trends in kitchen design so they can give you a beautiful space that will last. They stay up to date by attending trade shows, continuing education seminars, and visiting with manufacturers’ representatives regularly. They also use high-tech offerings like 3D renderings and floor plans to show you how a kitchen will look once it’s built. These tools can save you a lot of hassle and money by avoiding unnecessary changes later on.

They Can Help You Save Time

Whether you need to reface cabinets or remodel your whole kitchen, hiring a professional is a good idea. They can help you save time and money by reducing construction delays and ensuring a smooth, efficient project.

They can also help you design a kitchen that will be functional and attractive. They know how to optimize storage, ergonomic features, and floorplans so that you can work efficiently in your new kitchen.

For instance, experts in interior design for kitchen St. Louis offer a free consultation to determine if they fit your needs. This can take an hour or less and can include:

  • A plan or sketch of the room.
  • Images of other kitchens you like.
  • Budget information.

They Can Help You Save Energy

The kitchen is one of the best areas to make a difference regarding energy efficiency. You can replace old appliances, update plumbing fixtures and install new lighting to save you money on utility bills.

When working with a professional, you can rest assured that they have the knowledge and expertise to help you achieve your goals. They can guide you through choosing lighting, fixtures, and cabinets to make your kitchen function more efficiently and add value to your home. When choosing a designer, you should look for their credentials, website or portfolio, and 3D renderings of their work. The best designers can create impressive, accurate 3D drawings and animations so you can visualize your design before construction begins.

They Can Help You Save Money

Hiring a professional to redesign your kitchen can save you money in the long run. They have experience working with vendors, suppliers, and contractors and know how to get the best prices and deals.

They are also used to managing a large project. This includes handling deliveries and scheduling tradespeople. Hiring a designer may be a good investment if planning a major remodel. They will help you create a plan that fits your budget and ensures your renovation succeeds. Another way to save money on a kitchen renovation is to consider reusing or refacing existing materials. You might be surprised at what is available for a fraction of the price of new cabinets and worktops.

The Ultimate Guide to Energy-Efficient Home Upgrades in 2023

As energy costs continue to rise, homeowners are increasingly seeking ways to make their homes more energy-efficient. Not only does this help to reduce energy bills, but it also helps to reduce the carbon footprint of the home. There are numerous ways that homeowners can upgrade their homes to be more energy-efficient, from simple changes to more significant upgrades. In this article, we will explore the ultimate guide to energy-efficient home upgrades in 2023.

Upgrade to Energy-Efficient Lighting

One of the simplest ways to make a home more energy-efficient is to switch to energy-efficient lighting. This can be done by replacing incandescent light bulbs with LED bulbs. LED bulbs use 75% less energy than incandescent bulbs and last up to 25 times longer, making them a cost-effective and environmentally friendly choice.

Install a Programmable Thermostat

Another way to save energy in the home is to install a programmable thermostat. This allows homeowners to set the temperature of their home at different times of the day, which can help to reduce energy usage when no one is home or during the night.

Insulate the Home

Proper insulation is crucial in maintaining an energy-efficient home. A well-insulated home can reduce energy bills by up to 20%. This can be achieved by adding insulation to the attic, walls, and basement. Homeowners can also install weather stripping around windows and doors to prevent drafts.

Upgrade to Energy-Efficient Appliances

Upgrading to energy-efficient appliances is another way to make a home more energy-efficient. Appliances such as refrigerators, washing machines, and dishwashers can consume a significant amount of energy. By upgrading to energy-efficient models, homeowners can save money on their energy bills while reducing their carbon footprint.

Install Energy-Efficient Windows

Windows are a significant source of heat loss in a home. By installing energy-efficient windows, homeowners can reduce heat loss and save money on their energy bills. Energy-efficient windows are designed to prevent heat loss and reduce the amount of energy required to heat the home.

Upgrade to Renewable Energy

Homeowners can also consider upgrading to renewable energy sources such as solar panels or wind turbines. These systems can help to reduce energy bills and provide a clean source of energy. While the upfront costs of these systems can be significant, they can pay for themselves over time.

Install Low-Flow Showerheads and Faucets

Another simple way to save water and energy is to install low-flow showerheads and faucets. These fixtures can reduce water consumption by up to 60%, which can result in significant savings on water bills.

FAQ’s

Why should I upgrade my home to be more energy-efficient?

Upgrading your home to be more energy-efficient can save you money on energy bills in the long run. It can also reduce your carbon footprint and contribute to a more sustainable future. Additionally, some energy-efficient upgrades may qualify for tax credits or incentives.

What are the most cost-effective energy-efficient home upgrades?

Some of the most cost-effective energy-efficient home upgrades include upgrading to LED lighting, installing a programmable thermostat, adding insulation, and installing low-flow showerheads and faucets. These upgrades are relatively inexpensive and can result in significant savings on energy bills over time.

Are there any financing options available for energy-efficient home upgrades?

Yes, there are several financing options available for energy-efficient home upgrades. Some utility companies offer low-interest loans or rebates for energy-efficient upgrades. Homeowners can also look into government programs such as the Federal Housing Administration’s Energy Efficient Mortgage or the Property Assessed Clean Energy (PACE) program. Additionally, some banks and credit unions offer home improvement loans specifically for energy-efficient upgrades.

Conclusion

There are numerous ways that homeowners can upgrade their homes to be more energy-efficient in 2023. From simple changes such as switching to LED bulbs to more significant upgrades such as installing solar panels, there are options for every budget and lifestyle. By making these changes, homeowners can reduce their energy bills, save money, and help to reduce their carbon footprint.