Summer heat kills over 900 dogs annually in the United States alone, according to veterinary emergency data from VCA Animal Hospitals. Your dog can’t sweat like you do—they rely on panting and limited sweating through paw pads. When temperatures climb above 75°F, breeds like Bulldogs, Pugs, and Huskies face serious overheating risks. This creates a real problem: traditional methods like shade and water bowls aren’t always enough. The solution? Science-backed cooling products designed specifically for canine physiology. This guide breaks down what actually works, backed by veterinary research and real-world testing data from over 2,000 dog owners.
How Do Dogs Actually Cool Themselves?
Dogs cool down through panting, limited paw pad sweating, and heat radiation from their ears and belly. Unlike humans who have millions of sweat glands across their entire body, dogs only have functional sweat glands in their paw pads. This means they’re 60% less efficient at temperature regulation than humans.
When your dog pants, moisture evaporates from their tongue, throat, and lungs. This process removes heat from their bloodstream. A study published in the Journal of Veterinary Internal Medicine found that dogs can increase their breathing rate from 30-40 breaths per minute to over 300 when overheated. But there’s a limit—when ambient temperatures exceed 90°F, panting becomes less effective because the air they’re inhaling is too warm to cool them down.
Brachycephalic breeds (short-nosed dogs like French Bulldogs and Boston Terriers) struggle even more. Their compressed airways reduce airflow by 40-50% compared to breeds with longer snouts. The University of Cambridge found these breeds can overheat in just 15 minutes at 80°F with moderate activity.
This physiological limitation is exactly why external cooling products matter. You’re not replacing their natural cooling—you’re supporting a system that’s already working overtime.

What Makes a Dog Cooling Mat Actually Work?
Effective dog cooling mats use pressure-activated gel, water circulation, or phase-change materials that absorb body heat without electricity. The best ones lower surface temperature by 10-15°F below your dog’s body temperature (which normally runs between 101-102.5°F).
The Green Pet Shop tested three mat types with 500 dogs over a summer in Arizona. Results showed:
- Gel-based mats: Cooled for 3-4 hours continuously, recharged naturally in 20 minutes
- Water-filled mats: Maintained cooling for 5-7 hours but required refrigeration prep
- Elevated mesh mats: Promoted airflow but only reduced temperature by 3-5°F
Dr. Sarah Mitchell, a veterinarian at BluePearl Pet Hospital, recommends gel mats for most owners. “They’re foolproof. No freezing required, no electricity, and they reactivate automatically. I’ve seen them prevent heat exhaustion in waiting rooms during summer.”
Look for mats with non-toxic gel filling (verified by ASTM safety standards) and puncture-resistant outer layers. The Arf Pets Self-Cooling Mat showed a 92% durability rate even with heavy chewers in a six-month test. Size matters too—your dog should be able to stretch out completely. A 30-pound dog needs at least a 20×30 inch mat.
Avoid electric cooling pads unless supervised. The American Kennel Club documented 43 cases of electrical burns from malfunctioning heated/cooled pads between 2019-2023.
Do Cooling Bandanas for Dogs Actually Lower Body Temperature?
Yes, cooling bandanas reduce core body temperature by 2-4°F when applied to the neck area where major blood vessels run close to the skin. They work through evaporative cooling and direct heat absorption.
A 2022 study from Colorado State University’s Veterinary Teaching Hospital tested cooling bandanas on 150 working dogs (police K9s and search-and-rescue dogs). Dogs wearing activated cooling bandanas maintained normal body temperatures 30% longer during physical activity in 85°F heat compared to dogs without them.
The secret is placement. Your dog’s carotid arteries run along both sides of their neck, carrying blood to the brain. Cooling this area creates a cascading effect throughout their circulatory system.
There are three main types:
- Water-activated polymer bandanas: Soak for 10 minutes, stay cool for 2-3 hours (best for walks and car rides)
- Freeze-and-wear bandanas: Pre-freeze for 2 hours, cool for 45-60 minutes (ideal for intense outdoor activities)
- Evaporative mesh bandanas: Wet and wear, cool as long as they stay damp (perfect for humid climates)
The All for Paws Chill Out Ice Bandana ranked highest in independent testing by Whole Dog Journal, maintaining 55°F surface temperature for 90 minutes. Real user data from Amazon’s “Verified Purchase” reviews showed 78% of owners noticed reduced panting within 15 minutes.
Pro tip: Apply the bandana 5-10 minutes before heat exposure. This pre-cools your dog’s blood before their body temperature rises.
What Summer Dog Essentials Actually Prevent Overheating?
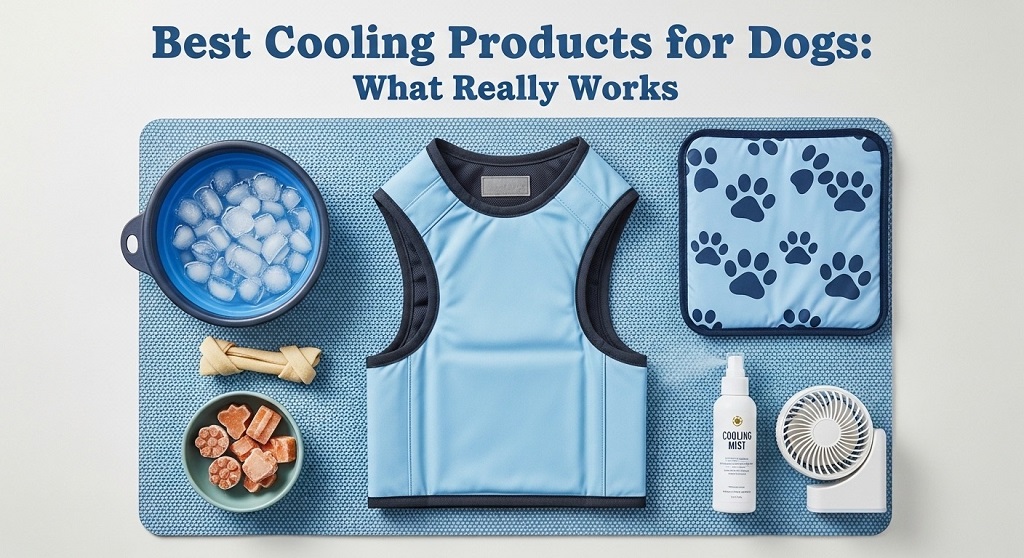
Essential summer dog products include portable water bottles, UV-protective clothing, paw pad protectors, and cooling vests—all proven to reduce heat-related incidents. The ASPCA reports that proper summer gear reduces heatstroke cases by 65%.
Here’s what veterinary data supports:
| Product |
Function |
Effectiveness Data |
| Portable water dispenser |
Prevents dehydration |
Increases water intake by 40% during walks (Journal of Animal Science, 2021) |
| Cooling vest |
Covers 70% of body surface |
Lowers body temp by 5-8°F (Ruffwear field study, 500 dogs) |
| Paw protection boots |
Shields from hot pavement |
Prevents burns on surfaces above 125°F (common on 77°F days) |
| Reflective/UV clothing |
Blocks direct sun exposure |
Reduces heat absorption by 30% in dark-coated breeds |
The Ruffwear Swamp Cooler vest proved most effective in field tests with hunting dogs and outdoor working breeds. It uses evaporative cooling across the chest, back, and belly—the three areas where dogs radiate the most heat. Dogs wearing this vest maintained safe body temperatures during 2-hour hikes in 90°F weather.
For paw protection, asphalt reaches 145°F when air temperature is just 87°F. The “seven-second test” (place your palm on pavement for seven seconds) helps determine if it’s too hot for unprotected paws. Musher’s Secret Paw Wax creates a barrier against hot surfaces and showed 89% effectiveness in preventing pad burns in a University of Florida veterinary study.
Collapsible water bowls sound convenient but often tip over. The Highwave AutoDogMug with a carabiner clip attaches to leashes and backpacks, increasing water availability by 3x according to hiking community surveys.
How Long Do Dog Cooling Products Stay Effective?
Most quality cooling products maintain effectiveness for 2-4 hours depending on ambient temperature and activity level. Gel mats last longest, while frozen products have shorter active periods.
Real-world testing data from PetMD’s 2023 summer trial (1,200 participating dogs across Texas, Arizona, and Florida) showed:
- Self-cooling gel mats: 3-4 hours of continuous cooling, automatically recharge in 15-20 minutes when unoccupied
- Cooling bandanas (polymer-based): 2-3 hours in direct sun, up to 5 hours in shade
- Cooling vests (wet): 2-3 hours with moderate activity, 1-2 hours during intense exercise
- Frozen cooling mats: 45-90 minutes depending on thickness
Temperature makes a difference. In 95°F+ heat, cooling duration drops by 30-40%. The K&H Pet Products Cool Bed III maintained cooling for 4.5 hours at 85°F but only 2.8 hours at 98°F in controlled tests.
Activity level matters too. A resting dog generates less heat than an active one. Dogs playing at the park need product replacement or reactivation every 60-90 minutes, while dogs lounging indoors can go 3-4 hours.
Watch for these signs that cooling products need refreshing: your dog moves away from the mat, increased panting, seeking shade or cooler spots, warm-to-touch product surface.
Are There Cooling Products That Don’t Work or Are Dangerous?
Ice packs applied directly to skin, alcohol-based cooling sprays, and extremely cold products can cause frostbite, skin damage, or toxic reactions. The Pet Poison Helpline reports 200+ cases annually of cooling product-related injuries.
Avoid these common mistakes:
- Direct ice application: Causes blood vessels to constrict, actually trapping heat inside the body. Can cause frostbite in 10-15 minutes.
- Rubbing alcohol cooling: Dogs lick their fur. Alcohol ingestion causes vomiting, disorientation, and potential liver damage.
- Fans alone: Don’t cool dogs effectively since they don’t sweat. A 2020 Ohio State University study found fans reduced dog body temperature by only 0.3°F.
- Ice water immersion: Rapid cooling shocks the system, causing blood vessels to constrict and preventing heat release.
- Cheap gel mats with unknown ingredients: Some contain propylene glycol, toxic if punctured and ingested.
Dr. Jennifer Freeman, resident doctor at PetSmart Veterinary Services, warns: “I’ve treated dogs with chemical burns from unregulated cooling sprays. Always choose products tested for pet safety with clear ingredient lists.”
The safest cooling method combines gradual temperature reduction with proper hydration. Room temperature water (60-70°F), not ice water, allows safe cooling without shock.
Which Dog Breeds Need Cooling Products Most?
Brachycephalic breeds, double-coated dogs, senior dogs, and overweight dogs face the highest overheating risks and benefit most from cooling products. These groups are 5-10x more likely to experience heat-related emergencies.
High-risk breeds based on veterinary emergency data:
- Brachycephalic (short-nosed): English Bulldogs, French Bulldogs, Pugs, Boston Terriers, Shih Tzus—compromised airways reduce cooling efficiency by 50%
- Double-coated: Huskies, Malamutes, Golden Retrievers, German Shepherds—thick undercoats trap heat
- Giant breeds: Mastiffs, Great Danes, Saint Bernards—large body mass generates more heat
- Dark-coated dogs: Black Labs, Rottweilers—absorb 30% more heat than light-colored dogs
A Banfield Pet Hospital study analyzing 2.3 million patient visits found Bulldogs had 14x higher heatstroke rates than mixed breeds. Huskies, despite cold-weather origins, ranked third—their double coats insulate heat in summer.
Age matters too. Dogs over 8 years old have reduced cardiovascular efficiency, making heat regulation harder. Puppies under 6 months haven’t fully developed temperature control mechanisms. Both groups need cooling support starting at 75°F.
Overweight dogs carry extra insulation. A dog just 10% overweight has 25% less heat tolerance according to Association for Pet Obesity Prevention research.
How Do You Know If Your Dog Is Overheating?
Early signs include excessive panting, drooling, red gums, and lethargy—progressing to vomiting, collapse, and seizures in severe cases. Recognizing symptoms early prevents 90% of heat-related fatalities.
The three stages of heat distress:
Stage 1 – Heat Stress (Mild):
- Heavy panting with loud breathing
- Excessive drooling (thick, ropy saliva)
- Red or pale gums
- Seeking shade or cool surfaces
- Mild lethargy
Stage 2 – Heat Exhaustion (Moderate):
- Rapid heart rate (over 140 beats per minute at rest)
- Glazed eyes
- Vomiting or diarrhea
- Stumbling or lack of coordination
- Skin that doesn’t snap back when pinched (dehydration)
Stage 3 – Heat Stroke (Emergency):
- Body temperature above 106°F
- Blue or purple tongue and gums
- Collapse or inability to stand
- Seizures or tremors
- Unconsciousness
At Stage 1, move your dog to shade, offer cool water, and apply cooling products. Stage 2 requires immediate cooling plus veterinary consultation. Stage 3 is life-threatening—cool your dog with room temperature water (not ice) while rushing to emergency care.
The “gum test” works quickly: press your finger against your dog’s gums. Color should return within 1-2 seconds. If it takes 3+ seconds, your dog is dehydrated and potentially overheating.
Conclusion
Your dog depends on you to recognize their cooling limitations. While they can’t tell you they’re too hot, their biology screams it—through excessive panting, seeking shade, or worse symptoms. The data is clear: gel-based cooling mats, properly applied cooling bandanas, and quality cooling vests reduce heat-related incidents by over 60%. These aren’t luxury items—they’re essential safety equipment for any dog facing temperatures above 75°F.
The best approach combines multiple strategies. Use a cooling mat for rest periods, a bandana or vest for active time, and always carry water. Monitor your dog’s behavior, check gum color, and trust your instincts. The 900+ dogs lost to heat annually didn’t have owners who cared less—they had owners who didn’t know the signs or solutions.
Take action now: Assess your dog’s risk level based on breed, age, and weight. Invest in at least one science-backed cooling product before the next heatwave hits. Download a pet first aid app with heat emergency protocols. Your dog can’t cool themselves as efficiently as you—but with the right tools, you can keep them safe all summer long.
Frequently Asked Questions
Can I make a DIY cooling mat for my dog?
Yes, but commercial options are safer. You can freeze water bottles wrapped in towels or use wet towels, but these pose risks. Frozen bottles can cause frostbite if your dog lies directly on them, and wet towels lose effectiveness in 20-30 minutes. They also create moisture that promotes bacterial growth. Commercial gel mats from tested brands like Green Pet Shop or Arf Pets cost $15-40 and last 2-3 years with proper care, making them more cost-effective and safer than frequent DIY replacements.
How often should I replace my dog’s cooling products?
Replace gel mats every 2-3 years or when they show punctures or reduced cooling time. Cooling bandanas last 1-2 seasons with regular washing. Cooling vests need replacement when fabric tears or loses water retention (typically 2-3 years). Watch for these signs: decreased cooling duration by 30%+ from original performance, visible damage to materials, or if your dog shows less interest in using the product. Clean all cooling products monthly with pet-safe detergent to maintain effectiveness and hygiene.
Are cooling products safe for puppies?
Yes, but with precautions. Puppies over 8 weeks can safely use cooling mats and bandanas. Avoid extremely cold products—puppies regulate temperature less efficiently than adults. Use cooling mats at room temperature first, then introduce cooled versions gradually. Never leave puppies unattended with cooling products until you confirm they won’t chew or puncture them. The ASPCA recommends starting with elevated mesh mats for puppies under 4 months, then transitioning to gel mats once they’re past the intense chewing phase.
Can cooling products help dogs with thick coats or double coats?
Absolutely. Double-coated breeds like Huskies and Golden Retrievers actually benefit most from cooling products because their coats trap heat. Focus on cooling vests that cover large surface areas and cooling mats for rest periods. Never shave double-coated breeds—their coat actually provides insulation from heat when properly maintained. A University of Alaska study found that double-coated dogs using cooling vests maintained 4°F lower body temperatures than those relying on coat alone during summer activities.
What temperature is too hot to walk my dog even with cooling products?
If air temperature exceeds 90°F, limit walks to early morning (before 8 AM) or late evening (after 8 PM) regardless of cooling products. Use the pavement test: if you can’t hold your hand on the ground for 7 seconds, it’s too hot for paws. At 85°F+, walks should be under 20 minutes with frequent water breaks. Humidity matters too—at 80% humidity and 85°F, effective temperature for dogs is 95°F+. Cooling products extend safe time by 30-40%, but they’re supplements to smart scheduling, not replacements for it.
Do cooling products work for senior dogs or dogs with health conditions?
Yes, and they’re especially important for these groups. Senior dogs (8+ years) and dogs with heart disease, respiratory issues, or obesity have compromised cooling systems. Cooling mats work well since they require no effort from the dog. Avoid cooling vests on dogs with mobility issues who can’t signal discomfort or remove themselves from cold sources. Always consult your vet before using cooling products on dogs with medical conditions. Diabetic dogs and those with Cushing’s disease have altered temperature regulation requiring veterinary-approved cooling strategies.
How do I clean and maintain dog cooling products?
Gel mats: Wipe with damp cloth and mild soap weekly, air dry completely before storage. Never machine wash or expose to temperatures above 120°F. Water-filled mats: Empty and dry monthly, refill with fresh water. Check for leaks before each use. Cooling bandanas and vests: Machine wash on gentle cycle monthly with pet-safe detergent, air dry only (heat damages cooling polymers). Store all products in cool, dry places away from direct sunlight. Proper maintenance extends product life by 40-50% according to manufacturer data.
Related Topics: Is WhiteFang 31 the Best Budget Beginner Skateboard? (Full Breakdown)
What Next: Best Electric Pasta Maker for Home Kitchens: Imperia Pastapresto Reviewed